Table of Contents
ToggleA white kitchen offers a clean, timeless canvas, but without the right backsplash, it can feel flat, sterile, or unfinished. The backsplash is where personality, texture, and color come together to define the space. Whether you’re planning a full kitchen remodel or a weekend DIY refresh, choosing the right backsplash makes all the difference. This guide walks through 15 proven backsplash ideas for white kitchens, from classic subway tile to bold patterns and natural stone. Each option includes material specifics, installation considerations, and tips to help you avoid common mistakes.
Key Takeaways
- A well-chosen backsplash for white kitchens adds personality and depth while preventing the space from feeling cold or sterile.
- Classic subway tile remains the most affordable and versatile backsplash option, offering easy installation and compatibility with nearly any kitchen style.
- Bold patterns like encaustic cement tiles and Moroccan zellige create striking focal points, but should be limited to the area between countertops and cabinets to avoid overwhelming the space.
- Natural stone backsplashes like marble and travertine require proper sealing and maintenance, with book-matched slabs offering a seamless, modern aesthetic without grout lines.
- Glass and metallic finishes provide sleek, contemporary backsplash solutions that reflect light and are easy to clean, making them ideal for modern kitchens.
- Budget-friendly DIY alternatives like peel-and-stick tiles, beadboard paneling, and kitchen-grade paint can transform your white kitchen without contractor costs.
Why White Kitchens Need the Perfect Backsplash
White cabinetry and countertops create a neutral foundation, but they also demand a backsplash that pulls its weight visually. Without a thoughtful backsplash, all-white kitchens can feel cold or institutional. The backsplash adds depth, defines the style, whether modern farmhouse, contemporary, or traditional, and protects the walls from water, grease, and food splatter.
From a practical standpoint, backsplashes behind the range and sink handle the most abuse. Porous materials like unsealed marble or matte-finish ceramics can stain or harbor bacteria if not properly sealed. Non-porous options like glazed porcelain, glass, or polished stone are easier to maintain and meet most local building codes for wet areas.
The backsplash also influences perceived scale. Vertical subway tile or narrow stacked patterns draw the eye upward, making low ceilings feel taller. Horizontal layouts or large-format tiles expand narrow galley kitchens. Choosing the right pattern, grout color, and material finish can reshape the room without moving a single wall.
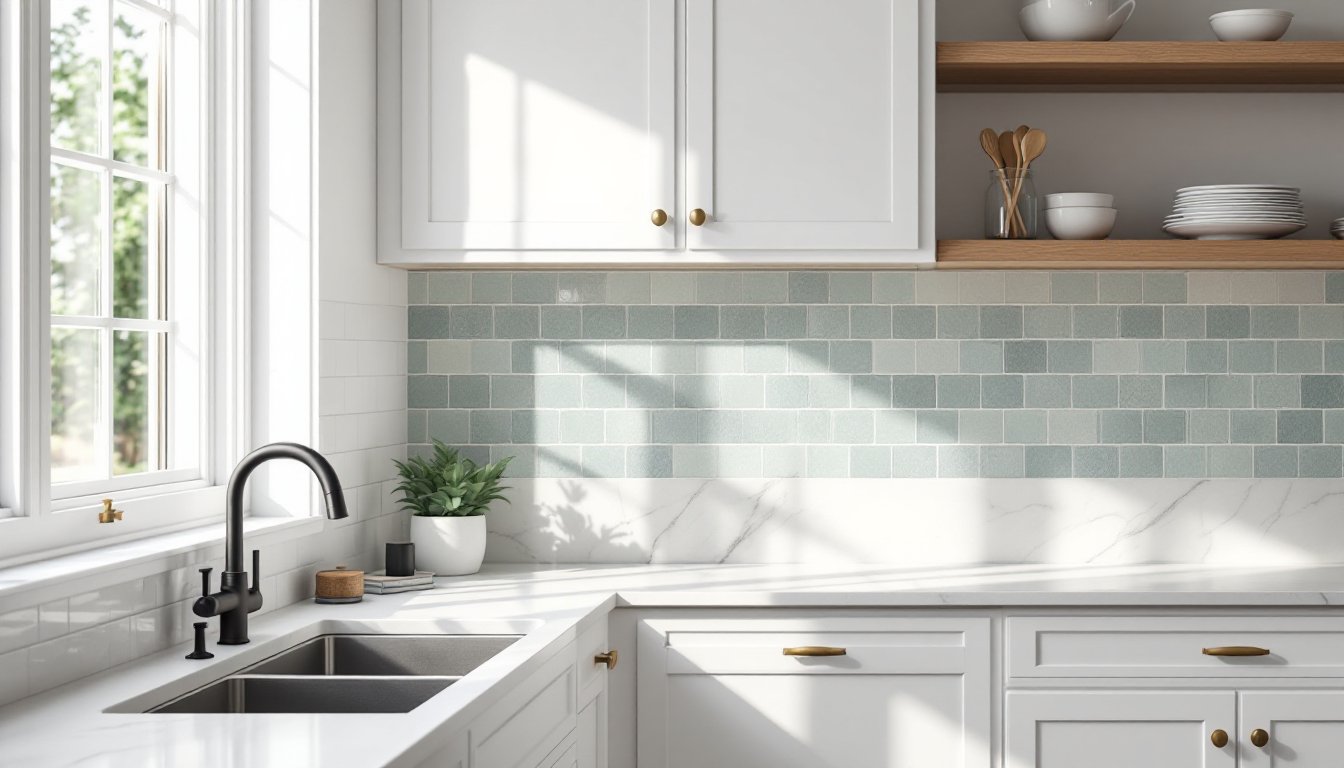
Classic Subway Tile Backsplash Options
Subway tile remains the go-to for white kitchens, and for good reason. Standard 3×6-inch ceramic or porcelain tiles are affordable, widely available, and easy to install with basic tiling skills. They pair with nearly any countertop material and withstand heat, moisture, and daily scrubbing.
Running bond (offset by half) is the traditional layout, but stacked (grid-aligned) and vertical orientations give a more contemporary look. Grout color matters: white or light gray grout blends in for a seamless finish, while dark charcoal or black grout creates bold contrast and hides staining over time. Grout joints should be a minimum of 1/16 inch for rectified tiles and 1/8 inch for standard-edge tiles.
For a twist, beveled subway tile adds subtle shadow lines, and handmade or glazed options introduce texture and slight color variation. Installation is straightforward with a notched trowel (typically 1/4 × 1/4-inch square notch for wall tile) and tile spacers. Seal grout lines with a penetrating sealer 72 hours after grouting to prevent moisture infiltration and mildew.
Subway tile works in any kitchen style. Pair white subway with brass or matte black fixtures for modern appeal, or combine with open shelving and butcher block for farmhouse charm.
Bold Pattern and Color Choices
White kitchens can handle bold backsplash patterns without feeling chaotic. Encaustic cement tiles, Moroccan zellige, and geometric porcelain bring color, pattern, and artisan character. These options turn the backsplash into a focal point and anchor the kitchen’s design.
Encaustic tiles are pigmented cement, not glazed ceramic. They’re durable but porous, seal them with a high-quality penetrating sealer before and after grouting. Expect to reseal annually in high-traffic areas. Standard thickness is 5/8 inch, and they’re heavier than ceramic, so ensure wall substrate is solid (cement board over drywall in wet zones).
Zellige tiles are handmade Moroccan clay tiles with an irregular, glossy finish. Surface variation is part of the appeal, no two tiles match exactly. They’re thinner than encaustic (around 3/8 inch) and require skilled installation to manage uneven edges. Many designers use minimal grout joints (1/16 inch or less) to let the tiles touch, creating a more organic look.
For a budget-friendly alternative, printed porcelain or ceramic tiles mimic encaustic patterns at a fraction of the cost. They’re also non-porous, easier to clean, and don’t require sealing. Kitchen design trends showcased on platforms like Homedit often feature these high-impact patterns in contemporary spaces.
Color placement tip: If using a vibrant or busy pattern, limit it to the area between the countertop and upper cabinets. Extending bold patterns to the ceiling or around windows can overwhelm the space.
Natural Stone and Marble Backsplashes
Natural stone brings organic texture and luxury to white kitchens. Marble, travertine, slate, and quartzite each offer distinct looks and performance characteristics. Marble is the most popular for high-end kitchens, but it requires well-informed choice-making.
Carrara marble is the classic white-and-gray option. It’s softer than granite (Mohs hardness around 3–4) and can etch from acidic foods like lemon juice or tomato sauce. For backsplashes, etching is less of a concern than on countertops since direct contact with food is minimal. Honed (matte) finishes hide etching better than polished. Seal marble with an impregnating sealer every 6–12 months.
For a dramatic look, book-matched marble slabs create a mirrored vein pattern. This requires a fabricator to cut and install large-format slabs (typically 2×4 feet or larger), which means higher material and labor costs. Slab backsplashes eliminate grout joints, making cleaning easier and giving a seamless, modern aesthetic.
Travertine offers an earthy, textured surface with natural pitting. Fill holes with color-matched epoxy before installation to prevent food and grease buildup. Slate provides a rustic, matte finish in charcoal, green, or rust tones, ideal for farmhouse or industrial kitchens.
Installation note: Stone tiles are heavier than ceramic. Use a polymer-modified thinset mortar rated for natural stone (white thinset prevents dark bleed-through on light stone). Always back-butter each tile (apply mortar to both wall and tile back) to ensure full adhesion.
Modern Glass and Metallic Finishes
Glass tile and metal finishes deliver a sleek, contemporary look and are among the easiest backsplash materials to clean. Glass is non-porous, stain-proof, and reflects light, which helps brighten smaller kitchens or spaces with limited natural light.
Glass tiles come in standard 3×6-inch subway shapes, small 1×1-inch mosaics, and large-format panels. Clear or frosted glass in cool tones (whites, grays, pale blues) keeps the palette neutral, while jewel tones (emerald, cobalt, amber) add a pop of color. Installation requires white thinset mortar, gray thinset shows through translucent glass and muddies the color.
Cutting glass tile requires a wet saw with a glass-specific blade. Score lightly and make multiple passes: forcing the cut can chip edges. Wear safety goggles and gloves, cut edges are sharp. Use unsanded grout for joints 1/8 inch or smaller: sanded grout can scratch the glass surface.
Stainless steel tiles or brushed metal panels suit modern and industrial kitchens. They’re heat-resistant, making them ideal behind ranges. Fingerprints and water spots are visible on polished finishes, so opt for brushed or matte surfaces in high-use areas. Clean with a microfiber cloth and pH-neutral cleaner, acidic or abrasive cleaners can damage the finish.
Mirrored or antiqued glass adds vintage glamour but shows smudges easily. Reserve these for sections with less splatter, such as above open shelving, rather than directly behind the sink or cooktop.
Budget-Friendly DIY Backsplash Ideas
You don’t need a big budget or a contractor to upgrade a white kitchen backsplash. Several materials and methods are DIY-friendly and cost-effective, especially for renters or homeowners planning to sell soon.
Peel-and-stick tile has improved dramatically in recent years. Quality vinyl or gel-based products mimic ceramic, marble, or metal and adhere directly to clean, smooth drywall or existing tile. They won’t withstand the same heat or moisture as real tile, so avoid placing them directly behind a range without a heat shield. They’re removable, making them ideal for rentals. Expect to pay $0.50–$2.00 per square foot. Clean the wall with TSP (trisodium phosphate) or degreaser before applying to ensure good adhesion.
Beadboard paneling or shiplap in painted white or light gray creates texture without grout maintenance. Use PVC or moisture-resistant MDF in wet areas, not standard wood, which can warp. Install with construction adhesive and finish nails, then seal seams with paintable caulk. Prime and paint with a satin or semi-gloss finish for easy wipe-down. This approach works well in cottage or farmhouse kitchens.
Paint is the ultimate budget option. Use a high-quality acrylic or epoxy-based paint formulated for kitchens and bathrooms. Semi-gloss or satin finishes resist moisture and clean up easily. A fresh coat of paint in a soft gray, sage, or navy adds color without tile cost or demo. For extra durability, top with a clear acrylic sealer.
Additional resources for creative kitchen design approaches can help refine your vision. Many homeowners also explore curated backsplash inspiration galleries before finalizing their layout and material choices.
Tool checklist for most DIY tile installs:
- Notched trowel (size depends on tile)
- Tile spacers
- Wet saw or tile cutter
- Grout float
- Sponges and buckets
- Level (2-foot or 4-foot)
- Safety goggles and dust mask
Conclusion
The right backsplash transforms a white kitchen from blank to bold. Whether you’re drawn to the clean lines of subway tile, the artisan appeal of encaustic patterns, or the elegance of marble, each option brings its own character and practical considerations. Choose materials that fit your skill level, maintenance preferences, and budget. With proper prep, the right tools, and attention to detail, most backsplash projects are well within reach of a confident DIYer, and the impact is immediate.


