Table of Contents
ToggleBedroom walls often get overlooked, left blank while floor space gets cluttered with dressers and nightstands. Wall shelves flip that script, turning vertical real estate into functional storage and display zones. Whether someone’s working with a cramped city apartment or just wants to clear off the dresser, the right shelf setup can open up square footage and add personality without the commitment of built-ins. From floating ledges to corner units, bedroom shelves solve storage problems while keeping the look intentional, not like a dorm room afterthought.
Key Takeaways
- Bedroom wall shelves transform unused vertical space into functional storage and display zones, reclaiming up to 18 square feet that would otherwise sit empty.
- Floating shelves provide a clean, modern look by hiding mounting hardware, but proper anchoring with toggle bolts or studs is essential for safety and stability.
- Corner shelves maximize dead space at 90-degree wall intersections, with height placement ranging from 12 to 72 inches depending on item weight and accessibility.
- Built-in shelving adds measurable resale value and solves awkward layouts, though installation requires carpentry skills and potential building permits for wall modifications.
- Material selection should match the load and aesthetic: hardwood for durability and traditional styles, MDF for budget-friendly decorative shelves, and metal or glass for modern designs.
- Proper installation technique—including measuring twice, using a quality level, and investing in rated hardware—separates a polished shelf setup from one that looks crooked or unstable.
Why Wall Shelves Are Perfect for Bedrooms
Bedroom furniture eats floor space fast. A standard six-drawer dresser occupies roughly 18 square feet, while wall shelves reclaim vertical zones that typically go unused. That’s real estate anyone can’t walk on but can definitely use.
Wall-mounted storage keeps dust bunnies from colonizing under furniture and makes vacuuming less of an obstacle course. Unlike freestanding bookcases, properly anchored shelves won’t tip, critical in homes with kids or pets. They also dodge the need for furniture backing, which means they work on any wall without worrying about outlet access or baseboard clearance.
Shelves let homeowners customize height and spacing to fit what they actually own. Books, plants, folded sweaters, alarm clocks, or a collection of vintage cameras, shelves adjust to the stuff, not the other way around. And when it’s time to move or repaint, patching a few screw holes beats wrestling a wardrobe down a narrow staircase.
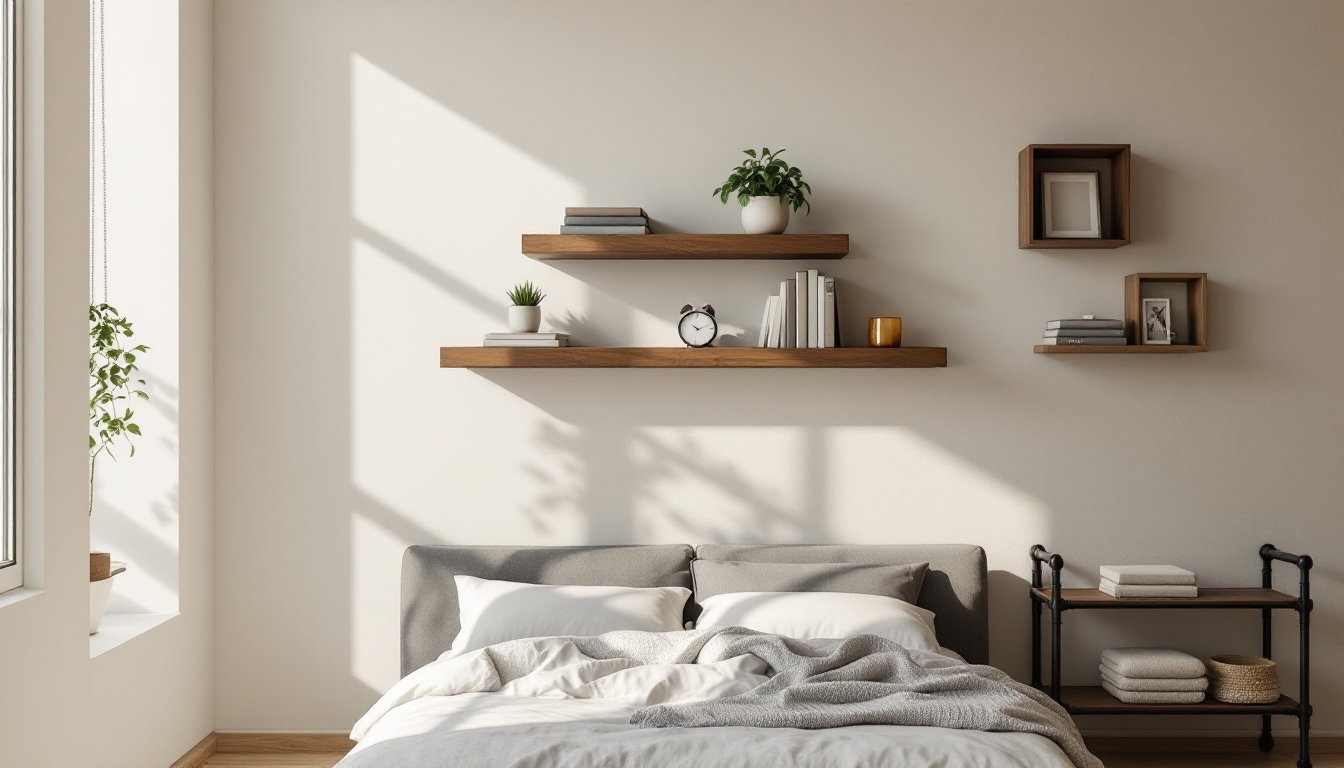
Floating Shelves for a Modern Minimalist Look
Floating shelves hide their mounting hardware, creating the illusion that they’re levitating off the wall. No visible brackets means clean sightlines, ideal for contemporary or Scandinavian-influenced bedrooms where every detail counts.
Most floating shelves use concealed brackets or metal rods that slide into routed channels in the shelf back. Solid wood options (pine, oak, walnut) typically measure 1.5 to 2 inches thick and handle 15 to 50 pounds per linear foot, depending on the bracket system and wall anchoring. For drywall installations, toggle bolts or heavy-duty anchors rated for the shelf’s load are non-negotiable. Hitting a stud is always preferable, 16-inch on-center spacing is standard in most residential framing.
MDF or engineered wood floating shelves cost less and come primed for paint, but they don’t forgive moisture or heavy loads as well as hardwood. A 48-inch MDF shelf should stay under 30 pounds total unless it’s anchored into studs at multiple points.
Installation requires a level (a 24-inch or longer model works best), drill, appropriate wall anchors, and patience. Measure twice, drill once. Shelves installed even slightly off-level will look crooked from across the room, and no amount of styling fixes that. For a polished finish, route the bracket holes from the backside to avoid visible seams on top.
Floating shelves excel above nightstands, flanking windows, or in narrow spaces like the wall beside a closet door. Keep them at arm’s reach, 48 to 60 inches from the floor, for daily-use items like books, glasses, or a charging dock. Anyone interested in a cohesive update might explore bedroom transformations that incorporate shelving into broader design changes.
Corner Shelves to Maximize Unused Space
Corners collect dead space. Standard furniture doesn’t fit the angle, and most people leave them empty or shove a plant there and call it done. Corner shelves turn that 90-degree intersection into usable square footage.
Triangular floating corner shelves mount directly to both walls, distributing weight across two planes. They’re ideal for lightweight items, small plants, decorative objects, a couple of paperbacks. For heavier storage, L-shaped bracketed shelves or multi-tier corner units provide more support. Materials range from wire (budget-friendly, industrial vibe) to solid wood (heftier, traditional).
Anchoring matters even more in corners. Drywall corners often lack stud backing on both sides, so toggle anchors or molly bolts become essential unless the corner happens to align with framing. Check with a stud finder before drilling, and don’t assume symmetry, older homes especially can surprise.
Corner shelves work above dressers, beside beds, or in tight alcoves. Stacking multiple tiers creates vertical storage without the footprint of a bookcase. For bedrooms doubling as home offices, a corner shelf unit can hold a small printer, notebooks, and charging cables without monopolizing desk space.
Height placement depends on use. Low corner shelves (12 to 18 inches from the floor) can corral shoes or bins: mid-height (36 to 48 inches) suits everyday items: high corners (72+ inches) display lightweight decor that’s seen but not handled daily. Measure the corner’s reach, if someone can’t access the back of the shelf comfortably, it’ll become a dust collector.
Built-In Shelving for Custom Storage Solutions
Built-ins feel permanent because they are. These shelves integrate directly into the wall structure, either by recessing into stud bays or constructing a frame that spans wall to wall. They’re a commitment, but they also add measurable resale value and solve awkward layout problems that off-the-shelf furniture can’t.
Recessed shelving fits between studs (typically 14.5 inches wide in a standard 16-inch on-center wall) and works beautifully in niches beside chimneys, between windows, or flanking a bed. Depth maxes out around 3.5 inches with 2×4 framing, so these suit books, small frames, or folded linens, not bulky storage bins. Cutting into a wall requires confirming there’s no plumbing, electrical, or HVAC in the cavity. A non-contact voltage tester and careful measuring prevent costly mistakes.
Floor-to-ceiling built-in units require more carpentry but deliver serious storage. Framing typically uses 1×12 or 1×10 boards for verticals and shelves, with a face frame and trim to blend with existing baseboards and crown molding. Anyone attempting this should be comfortable with a miter saw, pocket-hole jig, and finishing nailer. Free plans for narrow wall shelving are available from Ana White’s woodworking library, offering a solid starting point for DIYers.
Built-ins often need finishing work, caulking seams, filling nail holes, priming, and painting to match trim. Figure on two to three coats of paint for a professional look. If the bedroom’s in a rental or someone’s not ready for permanent changes, this isn’t the project. But for homeowners planning to stay put, built-ins rival closet organizers for bedroom functionality.
Permits: Cutting into walls or adding electrical (like integrated shelf lighting) may require permits depending on local codes. Check with the local building department before making the first cut.
Decorative Display Shelves for Personal Touches
Not every shelf needs to solve a storage crisis. Display shelves exist to showcase the stuff that makes a bedroom feel personal, travel souvenirs, framed photos, a vintage record collection, or a rotation of library finds.
Picture ledge shelves have a shallow lip (usually 0.5 to 1 inch) that keeps frames from sliding off. They’re perfect for rotating art or photos without committing to nail holes. Standard depths run 3 to 4 inches, just enough for a small frame or a paperback standing upright. Install these in a gallery wall arrangement or solo above a dresser.
Cube shelves (shadowboxes) add dimension and work well in clusters. A set of three or five cubes in varied sizes creates visual interest without requiring symmetrical spacing. They’re forgiving for renters, since each cube mounts with just a couple of screws. Fill them with plants, candles, or small sculptures, items that benefit from a defined frame.
Industrial pipe shelving brings a loft-style edge to bedrooms. Black iron or galvanized pipe paired with reclaimed wood planks reads masculine or edgy, depending on styling. Flanges screw directly into studs, and the pipe threads together without welding. Pipe shelves handle heavy weight (books, vinyl records, potted plants) and age well as the metal develops patina. Just wear work gloves, metal pipe edges can be sharp, and cutting threads leaves burrs.
Decorative shelves thrive above headboards, on accent walls, or in reading nooks. Keep spacing intentional. Shelves crammed too close look cluttered: too far apart reads disconnected. A general rule: 12 to 15 inches of vertical clearance between tiers gives each shelf breathing room. If the bedroom leans toward moody or layered decor, consider ideas from staircase gallery walls that translate well to bedroom accent zones.
Choosing the Right Materials and Finishes
Material choice affects shelf performance, longevity, and how much fussing they’ll need down the road. Match the material to the load, the look, and the skill level.
Solid hardwood (oak, maple, walnut) supports the most weight and lasts decades. It’s also the priciest and heaviest, requiring robust anchoring. Hardwood takes stain beautifully, so it’s the go-to for traditional or craftsman-style bedrooms. Expect to pay $15 to $40 per linear foot for pre-finished hardwood shelves, depending on species and thickness.
Pine or poplar offer a middle ground, affordable, paintable, and easier to work with hand tools. They’re softwoods, so they dent more easily under heavy objects, but for books or lightweight decor, they’re plenty sturdy. A coat of primer plus two topcoats of satin or semi-gloss paint protects the wood and simplifies cleaning.
MDF and particleboard cost the least and come pre-primed. They handle paint well and won’t warp like solid wood might in humid climates. Downside: they’re prone to sagging under weight and don’t hold screws as securely after the first installation. Use these for decorative shelves or light-duty storage, not book collections or shoe racks.
Metal and glass suit ultra-modern or industrial aesthetics. Powder-coated steel resists rust and scratches: tempered glass adds an airy feel but shows fingerprints and requires brackets rated for its brittleness. Both need careful anchoring, glass especially, since it doesn’t bend or forgive over-tightened screws.
Finish options range from natural wood oil (low-VOC, easy to touch up) to lacquer (durable, glossy, requires ventilation during application). For DIY builders, inspiration and tutorials from The Handyman’s Daughter cover finishing techniques that hold up to daily use.
Brackets and hardware shouldn’t be afterthoughts. Black matte brackets suit industrial or modern looks: brushed nickel or brass fit traditional or glam styles. Cheap brackets sag or bend under load, so invest in hardware rated for the shelf’s intended weight. Most manufacturers list load ratings, don’t exceed them, especially on drywall.
Conclusion
Wall shelves turn overlooked bedroom walls into working storage and style zones without the footprint or cost of new furniture. Whether someone’s installing sleek floating shelves, carving out built-ins, or styling a corner with stacked tiers, the right setup clears clutter and adds character. Match materials to the load, anchor properly, and don’t skip the level, those details separate a clean install from a regret.


