Table of Contents
ToggleBrick backsplashes aren’t just for loft apartments and industrial conversions anymore. Whether you’re drawn to the warm, rustic feel of classic red brick or the clean simplicity of painted white brick, adding brick to your kitchen walls brings texture, durability, and character that tiles can’t quite match. The material works in everything from farmhouse-style kitchens to sleek modern spaces, and installation options now range from full masonry work to DIY-friendly veneer panels. This guide walks through the most popular brick backsplash styles, material choices, and practical tips for getting the look right in your kitchen.
Key Takeaways
- Brick backsplash kitchen ideas offer superior durability, texture, and authentic character compared to ceramic or porcelain tile, requiring only a breathable masonry sealer for moisture and stain protection.
- Thin brick veneer and peel-and-stick panels provide DIY-friendly installation options for existing kitchens without the structural demands of full-thickness masonry, costing $5–$18 per square foot in materials.
- Classic red brick works best with warm metals and natural wood, while white or painted brick complements modern farmhouse and coastal styles, with grout color choice significantly influencing the overall aesthetic.
- Brick backsplash designs adapt across kitchen styles—from industrial and loft aesthetics using dark monochromatic brick to transitional kitchens with soft gray or greige tones paired with shaker cabinetry.
- Routine maintenance involves wiping with mild detergent, avoiding acidic cleaners on unsealed brick, and reapplying penetrating masonry sealer every 1–2 years to preserve appearance and protect against grease splatter.
- Reclaimed brick delivers authentic patina and variation ($8–$15/sq ft) but requires cleaning and sorting, while new brick ($3–$7/sq ft) offers consistency and lower cost for those prioritizing modern cleanliness.
Why Choose a Brick Backsplash for Your Kitchen?
Brick offers a few advantages over ceramic or porcelain tile. It’s heat-resistant, low-maintenance once sealed, and brings genuine texture rather than a printed pattern. The dimensional depth catches light differently throughout the day, adding visual interest without bright colors or busy designs.
Durability is a major selling point. Properly sealed brick resists stains and moisture well, though it’s not quite as impervious as glazed tile. You’ll want to apply a breathable masonry sealer (not a surface film) to protect against grease splatter and water.
Brick also ages gracefully. Minor chips or wear can add to the patina rather than looking like damage. If you’re after a lived-in, authentic feel, brick delivers that better than most manufactured materials.
From a design standpoint, brick pairs naturally with a range of finishes, stainless steel appliances, butcher block counters, marble, or concrete. It softens modern kitchens and grounds traditional ones. Just be aware that brick does add visual weight, so balance it with lighter cabinetry or open shelving if your kitchen is on the smaller side.
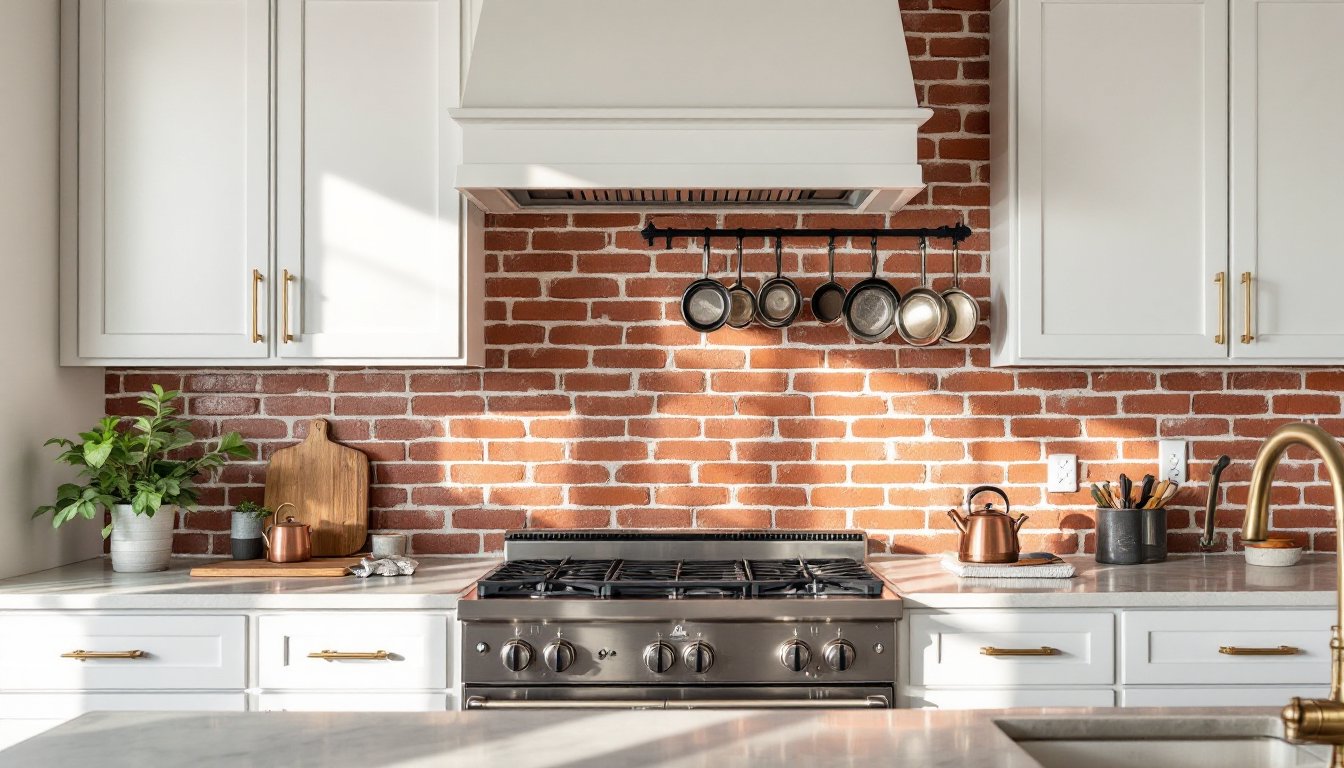
Classic Red Brick Backsplash Designs
Traditional red clay brick brings warmth and a slightly rustic edge. The color varies from deep burgundy to orange-red depending on the clay source and firing process. Running bond (the standard offset pattern) is the most common layout, but stack bond (aligned grid) creates a more modern, geometric look.
For a classic feel, use full-thickness brick (around 3.5″ deep) if your wall can handle the load and you’re comfortable with the projection. This works best in new construction or major renovations where you can plan for the added depth. Most residential kitchens use thin brick or brick veneer instead, which we’ll cover in a later section.
Reclaimed brick is worth considering if you want authentic character, old factory or street brick often has variation in color, slight chips, and mortar remnants that add texture. Expect to pay more ($8–$15 per square foot for materials alone) and be prepared to clean and sort pieces. New red brick runs $3–$7 per square foot depending on grade.
Grout color matters more than you’d think. Traditional gray mortar keeps the focus on the brick, while white or cream grout brightens the overall look and highlights the pattern. Dark charcoal grout creates a bold, graphic effect but shows dust more readily.
Pair red brick with natural wood cabinets, black or oil-rubbed bronze hardware, and warm metals like copper or brass. Avoid competing with too many other textures, let the brick be the star.
White and Painted Brick Backsplash Ideas
Painted brick lightens and modernizes the look while keeping the texture. White-painted brick is the most popular choice, offering a clean backdrop that works in farmhouse, coastal, and Scandinavian-inspired kitchens. It reflects light well, making small kitchens feel more open.
You can start with white brick (molded from white clay or concrete) or paint existing red brick. If painting, use a masonry primer followed by latex masonry paint or limewash for a more breathable, matte finish. Limewash penetrates the brick rather than coating it, creating subtle color variation and a chalky texture that ages beautifully. Standard latex paint gives more uniform coverage and is easier to wipe clean.
Soft grays, sage greens, and muted blues are gaining ground as alternatives to pure white. These colors add personality without overpowering, and they hide minor staining better than white. Test paint colors on a sample board first, brick absorbs paint differently than drywall, and colors often read darker once applied.
One caution: painted brick is harder to reverse than you might think. Paint soaks into the porous surface, so stripping it back to bare brick later is labor-intensive and may damage the brick face. If you’re unsure about committing, consider whitewashing (a thinned paint mixture) or limewash, both of which allow more of the brick color to show through and are slightly easier to remove.
White or painted brick pairs well with brass or gold fixtures, marble countertops, and light wood tones. It also provides a neutral canvas for colorful cookware, plants, or open shelving displays.
Modern Brick Veneer and Thin Brick Options
If you’re working with existing walls and don’t want to rebuild, thin brick or brick veneer panels are your best bet. Thin brick is real clay brick sliced to about 0.5″–1″ thickness. It installs with thinset mortar (the same adhesive used for tile) and weighs far less than full brick, so no structural reinforcement is needed.
Brick veneer panels are even easier. These are factory-assembled sections (often 24″ x 48″ or similar) with brick faces bonded to a backing material. Some are flexible enough to bend around slight curves or corners. Installation is faster than individual thin bricks, and the grout lines are pre-set, so you skip the grouting step. Quality varies widely, cheap versions look obviously fake, while higher-end products (like those from Boral or Glen-Gery) are nearly indistinguishable from real brick.
Peel-and-stick brick veneer exists, but it’s best for accent walls in low-moisture areas, not behind a cooktop or sink. Adhesive strength degrades with heat and humidity, and you’ll end up with peeling edges within a year or two. If you’re renting or want a temporary solution, go for it. Otherwise, use real thinset.
Thin brick and veneer open up color and texture options that full brick doesn’t offer as readily. You’ll find sleek charcoal bricks, glazed finishes, and even metallic accents. Many designers incorporate exposed brick backsplashes in modern kitchens by using dark or monochromatic brick for a clean, industrial vibe.
Cost comparison: Thin brick averages $5–$12 per square foot (material only), and veneer panels run $8–$18 per square foot. Installation costs drop significantly compared to full brick since no masonry contractor is needed, a capable DIYer can handle it with basic tile-setting skills.
Pairing Brick Backsplashes with Different Kitchen Styles
Brick adapts to nearly any design direction depending on color, finish, and surrounding elements.
Farmhouse and rustic kitchens: Red or whitewashed brick, open wood shelving, apron-front sinks, and vintage-style faucets. Use reclaimed brick if possible, and pair with butcher block or soapstone counters.
Industrial and loft-style kitchens: Exposed red brick (unsealed or lightly sealed to preserve the raw look), concrete countertops, stainless steel appliances, and metal pendant lights. Stack bond layout reinforces the modern edge.
Modern and minimalist kitchens: White, gray, or black painted brick in a running bond or vertical stack. Pair with handleless cabinetry, quartz counters, and integrated appliances. Keep grout lines thin and uniform.
Transitional kitchens: Neutral-painted brick (soft gray, greige, or off-white) bridges traditional and contemporary. Combine with shaker-style cabinets, mixed metal finishes, and classic subway tile on adjacent walls for contrast.
Coastal and cottage kitchens: Whitewashed or limewashed brick, light wood tones, and blue or green accents. Brick adds the texture that keeps coastal style from feeling too flat or generic.
The key is restraint. Brick is a strong visual element, so avoid layering too many competing textures (distressed wood + brick + patterned tile + ornate hardware = chaos). Let the brick anchor the space, and keep other finishes cleaner and simpler.
Installation Tips and Maintenance Considerations
Installation difficulty depends on the product. Full-thickness brick requires a masonry contractor and possibly a structural engineer to verify wall load capacity. Thin brick and veneer are DIY-friendly if you’re comfortable with tile work.
For thin brick installation:
- Prepare the surface. Walls must be clean, flat, and primed. Use cement backer board over drywall in wet areas (near sinks or dishwashers) for added moisture resistance.
- Lay out the pattern. Dry-fit the first few rows to check spacing and cuts. Use tile spacers (typically 0.5″ for brick) to maintain consistent grout lines.
- Apply thinset mortar. Use a notched trowel (1/4″ x 3/8″ notches work for most thin brick). Butter the back of each brick and press firmly, twisting slightly to set.
- Cut bricks as needed. A wet tile saw with a masonry blade handles cuts cleanly. A grinder with a diamond blade works for small notches.
- Grout the joints. Wait 24 hours for thinset to cure. Use sanded grout for joints wider than 1/8″. Apply with a grout float, remove excess with a damp sponge, and allow to cure per manufacturer instructions (usually 72 hours).
- Seal the brick. Apply a penetrating masonry sealer (not a topical coating) to protect against stains and moisture. Reapply every 1–2 years in high-use areas.
Safety: Wear safety glasses when cutting brick (fragments can fly), a dust mask for grinding or dry-cutting, and gloves when handling mortar (it’s caustic).
Maintenance is straightforward. Wipe down with a damp cloth and mild detergent for routine cleaning. Avoid acidic cleaners (vinegar, lemon) on unsealed or natural brick, they etch the surface. For grease buildup, use a degreasing dish soap or a pH-neutral masonry cleaner.
Sealed brick resists most staining, but porous, unsealed brick will absorb spills. If you’re after an aged, patina look, that’s part of the charm. If not, don’t skip the sealer.
Grout lines may darken over time from splatter and dust. A grout brush and baking soda paste can refresh them, or re-grout high-traffic sections if necessary. Many kitchen design resources recommend sealing grout separately from brick for added protection.
One last note: brick backsplashes don’t require permits in most jurisdictions (it’s cosmetic work, not structural), but if you’re removing drywall or altering wall framing, check local codes. When in doubt, contact your building department before starting.
Conclusion
Brick backsplashes bring warmth, texture, and durability that few other materials match. Whether you’re installing thin brick yourself or hiring out for full masonry, the range of colors, finishes, and styles means there’s a brick option for nearly any kitchen. For more brick backsplash ideas and installation guidance, explore project galleries and manufacturer specs to find the right fit for your space.


